TM is a leading telecommunications company in the Philippines, and now its users and subscribers must register their SIMs under the SIM Registration Act. Hence, this article will thoroughly discuss the mediums and steps for TM SIM Registration.
While working at its finest, TM offers five methods for SIM Registration, including the Official TM Website, GlobeOne Mobile App, and In-store Retailers. Meanwhile, users can also access SMS and USSD Code services for their SIM Registrations.
Before choosing any of the above-mentioned TM SIM registration sources, users must gather the mandatory documents, including a government-approved ID Card and Scanned Copies of SIM Receipt and Utility Bills.
Reasons For TM SIM Registration
TM SIM Registration is crucial to align with the newly approved SIM Registration Act. Otherwise, the company will either deactivate the unregistered TM SIMs or restrict such users from accessing the exclusive networking services.

Compliance with Registration Act
Forefrontly, the TM SIM Registration is mandatory to comply with the SIM Registration Act in the Philippines. Under this act, all local, overseas, and tourists must register their Smart SIMs to prevent the increasing digital fraudulent activities.

Enhanced Telecommunication Protection
As mentioned earlier, the Philippine Government has passed the SIM Registration Act to cope with illegal activities related to unregistered SIMs and unidentified users. Indeed, the authorities have the right to block all unregistered SIMs after the deadlines.

Access to Premium Network Services
To attract more Smart SIM users to the Registration Act, leading telecom companies have started offering premium networking services, including 5G Internet Speed and strong network signals even in the farthest regions.

Qualified For Promos & Deals
After registering their TM SIM Cards, users can start claiming exclusive rewards and promos on call packages and internet bundles. Moreover, the company offers slashed prices for Home WI-FI and International Calls to its registered subscribers.
Around-the-Clock Customer Support
Lastly, the TM Tambayan is bound to provide 24/7 customer support to its registered users. Subscribers can access the TM helpdesk via hotline, email, or the official website to claim various services related to troubleshooting issues.
Reasons For TM SIM Registration
When registering TM SIMs, users must provide valid verification documents for utmost success. Meanwhile, the following section will disclose the updated list of Documents required for TM SIM Registration in 2025.
Government-Approved ID: Whether you are local, overseas, or a tourist in the Philippines, it is mandatory to provide a valid ID for TM SIM Registration. The system doesn’t accept expired or torn IDs.
Complete Personal Details: TM SIM registrants must provide their authentic details, including complete name, verified home address, and utility bills. Users may need to upload scanned copies of these documents.
Verified TM SIM Information: When registering TM SIM, users must generate a signed receipt of their purchased TM SIM Card. Of course, the company verifies the ownership through an OTP message.
Additional Verification Documents: In rare cases, authorities could ask you to submit additional documents, such as the UMID Card, NBI Clearance, BIR ID, SSS ID, OWWA ID, Voter’s ID, Senior Citizen ID, and IBP ID.
Methods For TM SIM Registration
To ease the TM SIM Registration process, the company has introduced diverse mediums, including the Official TM Website, GlobeOne Mobile App, SMS Service, and USSD Code. Of course, all these methods are user-friendly and acceptable.
People Also Like: Bro Sim
TM SIM Registration via TM Portal

The Official TM Website offers various SIM-related services, including TM SIM Registration. However, users must ensure a stable internet connection and upload clear scanned copies of the required documents for instant approval.
- Open the default browser on your smartphone or PC and navigate to the official TM Website.
- You can follow the Link below
- Users can also access the TM Portal by scanning the QR Code. Use your mobile camera to scan the QR Code (Place QR Code Here)

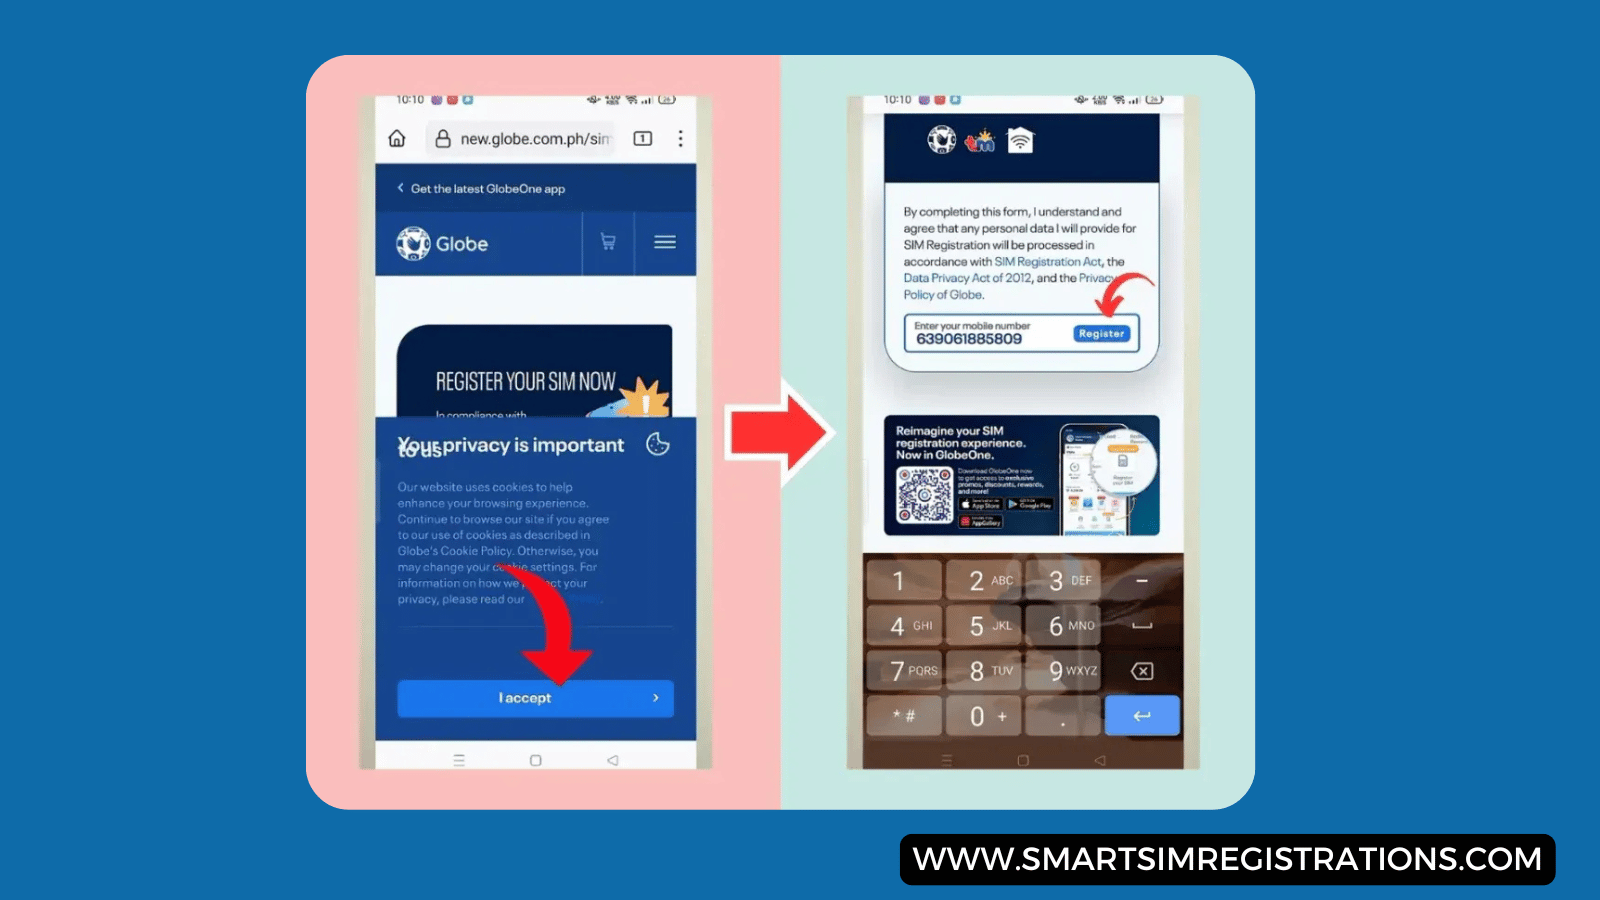
- After landing on the Homepage > click on the New TM SIM Registration option.
- Start by verifying your Mobile Number.
- Input the Mobile Number in the relevant field and wait for the OTP.
- Paste the OTP Code in the relevant box.
- After OTP verification, you’ll see a new page with TM SIM Registration Guidelines.
- Select your Registration Type from the available Menu and click continue.
- Next, guidelines for uploading ID and a Selfie will appear.
- Read the instructions carefully before continuing.
- Now, click Scan the Camera and place the valid ID card in front of it.
- Make sure the photo, name, address, and other details are clearly visible.
- Afterward, scan documents by allowing camera access to this website.
- You’ll see a message saying “Document Analysis Succeeded.”
- The upcoming prompt will show the Selfie Tips.
- Read the tips before taking a Selfie.
- After submitting a selfie, you’ll see a message “Trust Analysis Succeeded.”
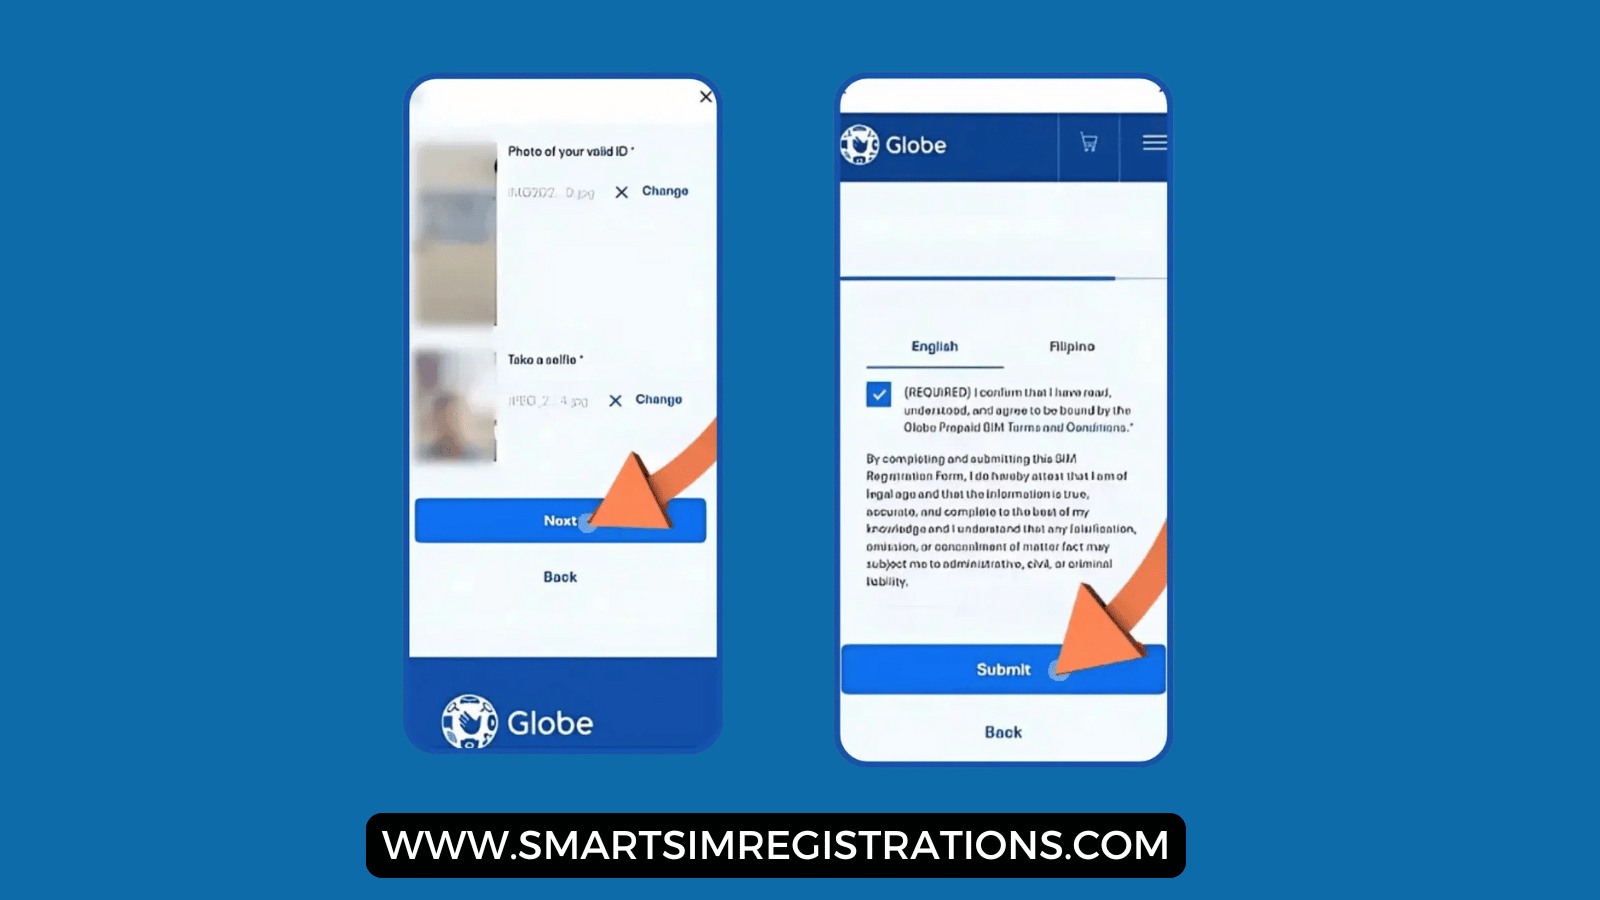
- Now, start filling out the TM SIM Registration form.
- Provide your valid details, including Full Name, Birthday, Gender, Address, and Nationality.
- Review the form before clicking the submit button.
- Don’t forget to tick the form saying “I confirm this statement.”
- Wait until the registration process completes.
- Shortly, you’ll get a TM SIM Registration Reference Code.
- Use this code after 24 hours to check your verification.
TM SIM Registration via GlobeOne App

GlobeOne App is another viable option for TM SIM Registration. Android and iPhone users can download the latest GlobeOne App from the Play Store and App Store, respectively, and create their accounts before applying for SIM Registration.
- Start by downloading the latest GlobeOne App on your Smartphone.
- After completing the download process, finish installing your device.
- Now, launch the app and create a new GlobeOne App Account.
- On the homepage > click three-dot option from the bottom right corner.
- Search for the SIM Registration option and start the registration process.
- Input your SIM Number and click on the Send OTP Button.
- Verify OTP by putting the code in the relevant box.
- After verifying your mobile number > start filling out the TM SIM Registration form.
- Upload scanned copies of your ID and a selfie for face verification.
- Fill in other relevant details, such as name, address, mobile number, etc.
- Double-check the form before clicking the submit button.
- Within the next 24 hours, you’ll receive a confirmation message.
TM SIM Registration via Authorized Retailer
TM Telecom has a strong network of Globe Stores across the Philippines. After purchasing a TM SIM Card from authorized retailers, users can request assistance with SIM Registration. However, you must carry the required documents.
- Open Google Maps on your smartphone and search for the nearby TM SIM Retail Store.
- Visit the Office, but remember to carry your verification documents.
- Ask the office representative for TM SIM Registration.
- Next, provide required documents, such as ID and SIM Receipt, etc, to the office assistant.
- After verification, the retailer takes your Biometric and a Selfie.
- Finally, you’ll receive a registration message on your mobile phone.
TM SIM Registration via SMS Service
Lastly, TM SIM users can use the standard TM SMS Service for their SIM registration. Notably, the TM SMS Service is free of cost, but subscribers must verify their identity via OTP before receiving a confirmation message of successful registration.
- Insert the newly purchased TM SIM Card into your Smartphone.
- You’ll receive a message requesting SIM Registration.
- Type Yes and send the message.
- Next, follow the on-screen prompts to start the SIM Registration process.
- The incoming command will prompt you to provide your details, including ID, complete address, and relevant information.
- After verification, you’ll receive an OTP on your assigned number.
- Verify the OTP Message.
- Finally, you’ll receive a message of successful SIM Registration.
Tips For Successful TM SIM Registration
During TM SIM Registration, the system thoroughly inspects the user’s identity and supporting documents before approval. Hence, the following section will provide some expert tips to enhance your chances for TM SIM Registration.
Always Provide Updated Details: The golden thumb rule to ensure success in TM SIM Registration is to provide authentic, verified, and updated details, including ID Card, Home Address, and other Private Details.
Upload a Valid & Clear Image: When registering TM SIM through the portal or the GlobalOne App, users need to upload scanned images of their ID Cards and Utility Bills. Of course, the system rejects dull or unclear images.
Double-Check Registration Form: After inputting your details on the TM SIM Portal or Mobile App, users must double-check their provided information before clicking the submit button, since there’s no option for future correction.
Insert SIM Carefully: Sometimes, the TM SIM Registration fails due to incorrect SIM insertion. Ultimately, the user can’t receive OTP for verification. Therefore, you must carefully insert the SIM card before registration.
Always Contact TM Support: If you face any issues during the TM SIM Registration process, contact TM Support. Interestingly, the TM Hotline and Official Website are operational 24/7 to assist users.
Troubleshooting TM SIM Registration Errors
TM Officials offer streamlined mechanics for SIM registration; however, users still face issues and difficulties during the process. Therefore, the forthcoming section will highlight some common TM SIM Registration issues and their verified solution.
Invalid ID Errors
During TM SIM Registration, invalid ID is probably the most encountered error, and it has several backend reasons. Among other possible causes, the TM Verification system denies expired or blurred ID cards and displays an ID error.
SIM Card Already Registered

Sometimes, the TM Portal shows the “SIM Card Already Registered” error during the registration process. Technically, users can overcome this issue by checking their SIM Card Registration Date or contacting the TM Support for further assistance.
Selfie Issue During Registration
When registering TM SIM through the portal or mobile app, users must upload their Selfie for verification. However, the system may not accept blurred or oversized selfies. Therefore, users must consider this formality to avoid issues.
OTP Not Received For Verification

TM sends an OTP to the provided mobile number during the registration process. Perhaps the OTP may fail to reach the recipient’s device within the given time. Of course, it is a network issue, and users may try moments later to overcome it.
App Crashed During Registration

GlobeOne is the official TM SIM Registration App for Android and iPhone users. The app may crash or malfunction during registration because the user is using an outdated app or due to a poor internet connection.
How to Contact TM Support For Assistance
For your information, TM offers 24/7 customer support through various mediums, including the official website, mobile app, hotline, and email. So, read the following guide to find the verified addresses of all TM Customer Desks.
Contact TM Support via Official Website
The TM Official Website is accessible to the SIM’s global users. Whether you want to register a TM SIM, launch a service-related complaint, or seek guidance about TM services, the TM portal is the best option for all such purposes.
Contact TM Support via Helpline
TM Hotline is another viable option for SIM Registration. TM subscribers can call the TM Helpline (02) 7730-1500to 5:00 pm or the Hotline Number 808 to seek assistance without requiring SIM balance or additional call charges.
Contact TM Support via Email
Another way to contact the TM Support is through their official email. Users can write their queries and send them to [email protected]. Practically, the officials respond with a solution within 48 hours.
Contact TM Support via Social Media
TM Tambayan frequently promotes its services via various social media platforms, including Facebook, Instagram, and X. In the meantime, users can use these social media channels to contact the TM support and seek verified solutions.
Answering Common Queries On TM SIM Registration
Since this article aims to assist users, the following section will answer queries related to the TM SIM Registration and other network-related services. Meanwhile, you can also contact us through the comments section if we fail to address any of your preferred issues.
Check Balance on TM SIM
After registering for TM SIM, users must recharge to start using network services. To check TM SIM Balance, type BAL and send it to 222, dial USSD Code *143#, or call 222. Notably, GlobeOne App also offers the TM SIM Balance Check Option.
Activating TM SIM Card
Under the TM SIM usage guidelines, new SIM users must register their SIMs before activating them. Of course, the TM SIM automatically activates once the registration completes through the TM portal or mobile app.
Confirm TM SIM Registration
Users can check their TM SIM Registration through the official TM Portal and GlobeOne Mobile App. Furthermore, TM subscribers can send a message “SMERG” to 8080 or visit a nearby TM Retailer to verify their registration.
Switch To TM Network
To your surprise, TM offers Mobile Network Portability under which users can switch to TM Tambayan from another mobile network. For this purpose, send a text “USC” to 5050, and the company will deliver you a new TM SIM with the same number used on another network.
Report Issues To TM Support
As mentioned earlier, TM offers diverse yet user-friendly customer support mediums. In all seriousness, users can access the TM Website, GlobeOne App, SMS Service, and Email to claim TM help regarding various service-related issues.

Conclusion
In short, all TM SIM users must register their new and existing SIM cards before the deadlines. Meanwhile, TM offers various SIM registration mediums, including the TM Web Portal, GlobalOne App, and SMS services. During TM SIM Registration, subscribers must provide valid details since using false information may result in imprisonment for up to 6 months or a fine of up to ₱300,000. Notably, the Government imposes similar punishments and financial penalties on users who refuse to register their TM SIMs within the given time. On the sidelines, bookmark our website and push the notification icon to receive an alert whenever we publish a new article or blog related to the Smart SIM Registration.
FAQs
